Helium Polish 5.5 is available for download at October 12, 2012.
- Consistency of Model Masses was Improved
- Changes in Motor Initialization
- Vacuum Pump Warm-Up
- Corrected Mass Parameter in Full Reports
- Photos Recording during Scanning. Model Building by Photos
- 5.1. Photos Recording during Scanning
- 5.2. Model Building by Photos
- New Optimization Algorithms in Recutting Process
- Yield Calculation in Recutting Process
- Model Export to ASCII
- Parameter Density in Reports
- Parameters Real Weight and Calculated Weight are Renamed in Reports
- New Pavilion Height(%) and Crown Height(%) Pictures in Any Cut Report
1. Consistency of Model Masses was Improved
Consistency of model masses defined on different OctoNus scanners was improved by changing the zoom-factor calibration algorithm.
2. Changes in Motor Initialization
Before version 5.5, motor initialization run every time prior to diamond scanning. Since version 5.5, initialization runs while application starts or after loss of USB connection.This allows to decrease time of scanning.
3. Vacuum Pump Warm-Up
We added a pre-scanning delay where the pump is switched on some time before scanning start (during the first run after loading program or after restore USB connection). We call this option Vacuum Pump Warm-Up.
The warming-up time is set in the Start / Inner / Options... panel, Scan tab, in the Warm up pump time field. The default value is 5 sec.
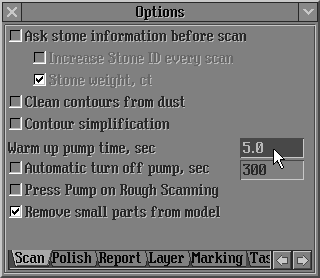
Before version 5.5, we did not use Vacuum Pump Warm-Up. Diamond displacement or loss from the holder could sometimes occur because the motor would start to rotate before sufficient vacuum pressure was gained between the holder and diamond surfaces. The Vacuum Pump Warm-Up option was implemented to avoid diamond displacement or loss from the holder.
4. Corrected Mass Parameter in Full Reports
We added a new parameter Corrected mass. It is available in Full Reports and has a bookmark [CORRECTED_MASS]. Corrected mass is the mass of a scanned model after applying correction that is an estimation of model creation accuracy.
For example, there are a circle, contour of this circle with sub-pixel's accuracy and polyhedron that is used for modeling this circle. If the polyhedron is circumscribed polygon and has restricted quantity of facets, so, in this case, the mass of polyhedron is always more than mass of circle. We can calculate this difference of masses and suggest more accurate estimation of circle's mass than polyhedron's mass.
Facets of real diamond have finite radius of fillet, unlike mathematical polyhedron. Depend on cutting we use different methods of models building, with excess or with insufficiency, by analogy with circumscribed or inscribed polyhedron for circle. So that, value of Corrected mass can be positive or negative.
See example of Full Report for Brilliant.
5. Photos Recording during Scanning. Model Building by Photos
Helium Polish software since version 5.5 is able to record photos during the scanning process and proceed it further in the mode of reading data from these photos. This allows obtaining new contours by photos and rebuilding the model without repeated scanning.
5.1. Photos Recording during Scanning
To record photos during scanning:
- Open the Marking-out panel and select the Process tab
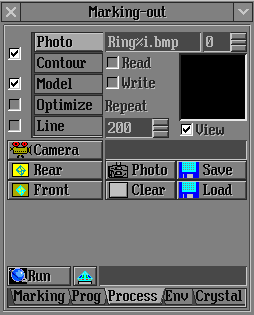
- Select the Photo tab and check the Write box
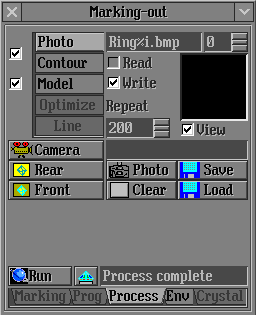
- Press Start button on Scan polished diamond panel (Start menu/Main/Scan polished diamond...) to start the scan process.
- Photos are recorded to root catalog/Scanned/recorded date&time/ folder and subfolders Images, Intermediate and Special. Sorted out photos are moved into the Cancel folder. System folder contains current background photo.
Note: The format of photos is defined in the Scan Photo series panel, in the Format section. Check box JPEG or BMP. The default format is JPEG.
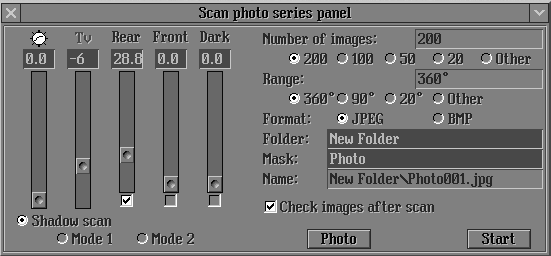
Photos in JPEG format take less size but BMP photos allow to get a model equivalent to the original model built during scanning.
5.2. Model Building by Photos
Model building by photos is available from this version via the Marking-out panel. Photos and additional support files are recorded during scanning to root catalog/Scanned/recorded date&time (see chapter 5.1) and can be used for model building.
Note: To get reliable results it is important to build model by photo on the same machine where these photos were recorded or in PacorClient application (since version 5.6) on any other machine according instruction for PacorClient 5.6.
To make a model using recorded photos:
- Check box scan and build options on the Marking-out panel
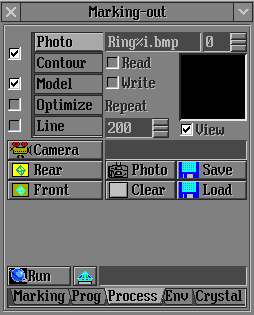
- Check box Read on Photo tab
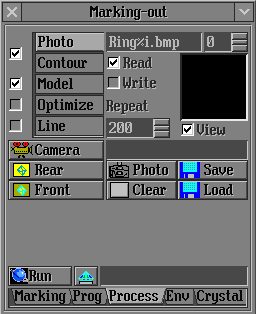
- Press Run button. Select folder with images panel is opened. Select folder with saved photos
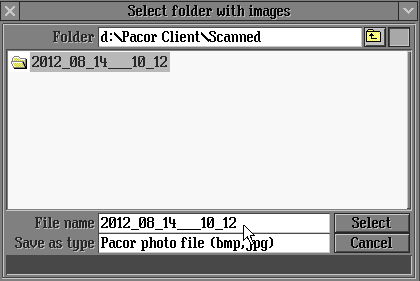
- Press Select button
- The application browses the photos, creates contours and builds a model
6. New Optimization Algorithms in Recutting Process
Recut process in Scan Polished Diamond panel resulted in correct solution of allocated diamond only if table plane of semipolished diamond coincides with holder plane (left picture below). For other table orientation program resulted in wrong result (right picture below). Table of the allocated diamond always looked downwards and was parallel to holder plane.
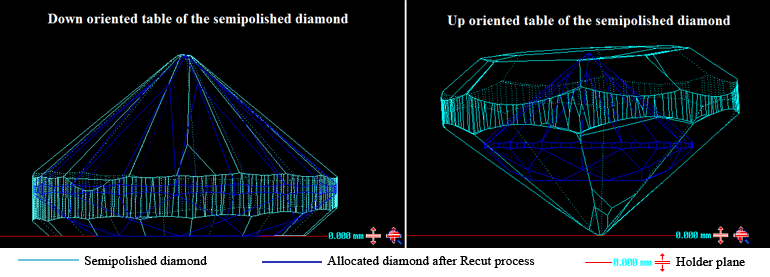
Since this version Recut process in Scan Polished Diamond panel supports choice between Semicut and Semicut (final) optimization algorithms.
Use Method field to select optimization algorithm:
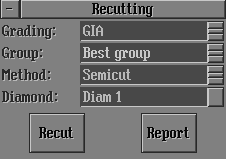
Semicut algorithm works both for up and down orientations of the semipolished diamond table or sawing plane relative to the holder parallel position (5-10° deviation is possible):
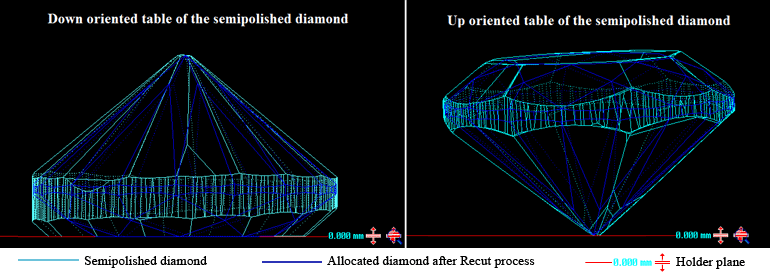
Semicut (final) algorithm results in solution where table of allocated diamonds looks downwards and is parallel to holder plane (the same behavior as algorithm in previous version).

7. Yield Calculation in Recutting Process
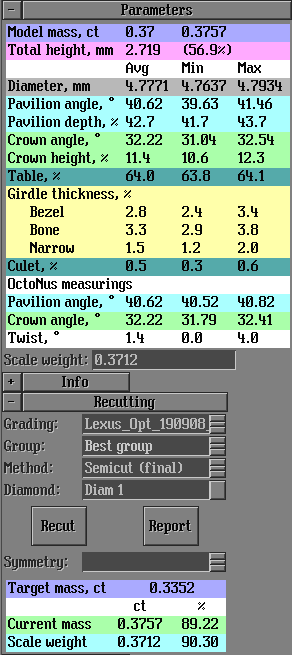
Interface and table contents are modified for Yield calculations from this version on – Recutting process in Scan polished diamond panel (Start/Main/Scan polished diamond).
- Source model mass is renamed from Source weight to Current mass.
- Inscribed cutting mass is renamed from Diamond weight toTarget mass.
- Yield calculation is available for source mass derived from weights – Scale weight field is added. Enter the value to Scan Polished diamond panel ->Parameters tab -> Scale weight field. Press Enter and apply Recut to get Yield values for source and scale weights.
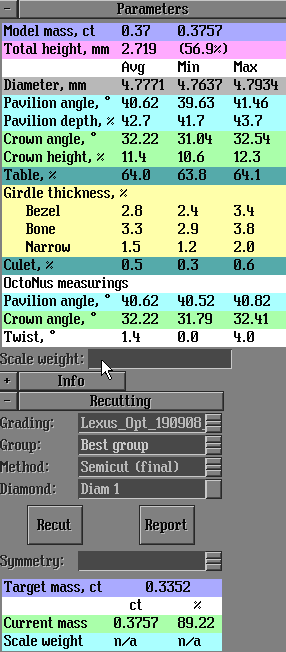
- If Scale weight value is empty, n/a will be displayed in the result table.
8. Model Export to ASCII
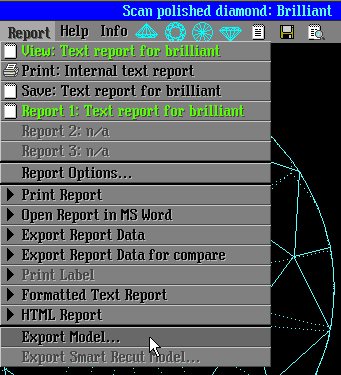
Model export to the ASCII format is available in the Scan polish diamond panel from the Report / Export model... section. In previous versions, saving a model as ASCII was possible by Autosave options only. (Autosave options are available in panel Options tab Polish that opens from the Start / Inner / Options… menu.)
To export a model into ASCII:
- Select from the Report / Export model… menu
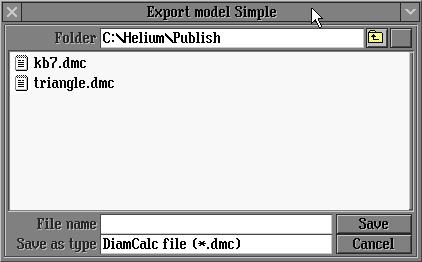
- The Export model window appears
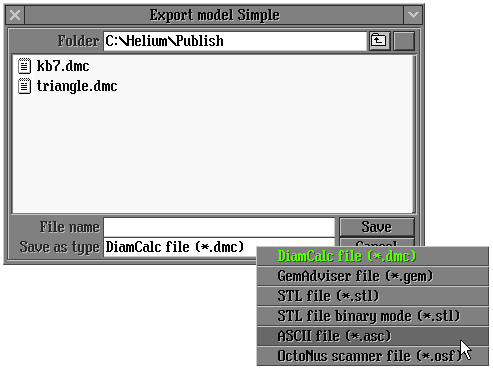
- Right click in the Save as type field to drop down the list of available formats:
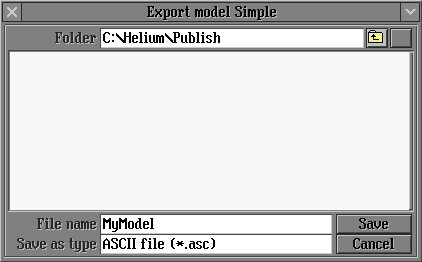
- Select from the ASCII file (*.asc) list, type a file name in the File name section and press Save
9. Parameter Density in Reports
We added Density output in reports. It can be found in Full Reports and has a bookmark [DENSITY].
See example of Full Report for Brilliant.
10. Parameters Real Weight and Calculated Weight are Renamed in Reports
Parameter Real Weight is renamed into Scale Weight and Calculated Weight is renamed into Model Mass.
Example of new Illustrated Report for Brilliant.
11. New Pavilion Height(%) and Crown Height(%) Pictures in Any Cut Report
Facet height (%) picture was replaced by Pavilion height (%) and Crown height (%) pictures in Any cut report . Now new pictures correspond with data for crown and pavilion heights from table with parameters values. Facet height (%) picture is available in Full report.
Example of new Illustrated Report for Any Cut for Brilliant:
|